Why does it matter?
Roof framing is the primary structural element of a roof.
Beneath the asphalt shingles or clay tiles or metal slats of your roof is an intricate structure, not unlike a skeleton. The framing of your roof is a crucial component to your home’s weather resistance, particularly in high-wind events.
As a homeowner, you need to make sure the structure and materials of your roof framing are both sound and secure.
What do I need to know?
Typically, residential roof framing is with wood rafters or wood trusses. However, there are also all-concrete roof systems available including precast planks, insulating concrete deck forming systems, and conventional concrete forming for increased resiliency of roof structures.
Your roof’s performance during high-wind events requires that the roof-framing members be properly designed and spaced, that there is proper lateral bracing supporting roof framing, and that there are adequate connections between the roof structure and the wall.
The FLASH Resilient Design Guide: High Wind Wood Frame Construction Edition provides the following guidance on resilient roof framing:
- Resilient framing spacing = 16” O.C.
- Resilient eave blocking = 2x eave blocking
- Resilient framing connection = metal strap at every truss, metal strap tie at ridge
Where do I start?
- In new construction, ensure there is a roof-to-wall connector at every truss or rafter where it sets upon the top of the wall.
- In an existing home, if roof-to-wall connections are not present, you may consider installing these during re-roofing when this area is more accessible by removing the lowest roof of roof sheathing.
- You may be able to retrofit and strengthen your existing roof framing without reroofing if you can access your attic by installing roof-to-wall connectors.
More Resources:
- FLASH. Resilient Design Guide: High Wind Wood Frame Construction Edition.
- Local Officials Guide For Coastal Construction.
Why does it matter?
Gabled roofs have two sloping sides that come together at a ridge, creating end walls with a triangular extension, called a gable. Gable end walls look like a standing letter “A” at the top as opposed to the more aerodynamic hip-shape roofs that look like a leaning letter “A.”
In nearly every hurricane from Hurricane Andrew in 1992 to Hurricane Michael in 2018, homes with unreinforced gable ends sustained high- wind damage. Often, the damage occurred because the large, flat areas of a gable end wall receive the wind’s full effect as it blows against the home.
Think of the gable end like a sail that meets the wind. When the wind overwhelms the sail, the boat moves. It is critical to reinforce your home’s gable end walls so nothing moves or is displaced when the wind hits it full force.
Gable end walls should be adequately braced and anchored as it is the place where the roof framing, decking, underlayment, and coverings meet. Fortunately, of all the possible structural retrofits for a house, gable-end walls are often the easiest to strengthen.
What do I need to know?
Three potential failures related to gable-end walls include:
- Loss of roof sheathing from the gable end that results in the gable wall losing its bracing along the top edge.
- Failure of the connection of the gable wall to the wall below.
- Failure of the framing members that make up the gable-end wall structure. In many houses, these members are the structural members of the end roof truss.
- The rake is an overhang at the gable-end wall that is particularly vulnerable to wind forces, so it should be adequately and properly attached to the rafters and top of the wall.
- Gable-end walls should be braced back into roof framing and must have a minimum 7/16” structural sheathing.
- Homes with gable ends built before modern building codes that required gable-end bracing should be retrofitted to meet today’s performance standards.
- The taller the gable-end triangle, the higher the risk of damage in a high-wind event. For gable ends that are more than 4-feet tall, nailed connections are unlikely to withstand high-wind forces. These gable ends should be retrofitted with the methods described in this article.
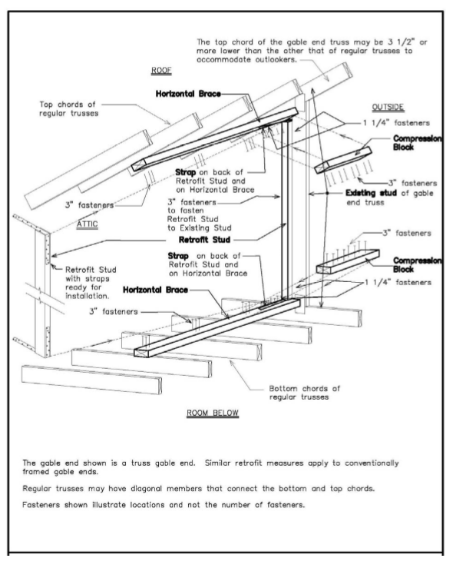
Retrofitting gable ends to brace the walls features two activities.
The first activity is strengthening and bracing the gable end. This retrofit makes the triangular shape end wall stronger by anchoring the wall to the roof and ceiling structure.
- The first step in strengthening and bracing the gable-end wall is installing 2×4 braces that butt up against the gable end that extend at least 6’ into the attic’s interior. These 2x4s, called Horizontal Braces, distribute (share) the wind loads applied to the gable-end wall with a larger area of the roof structure, permitting the house to absorb better the forces applied to the gable end. The horizontal braces are used to transfer the wind forces applied to the gable end into the roof and ceiling and distribute them over a large enough area to avoid local failures of the roof sheathing, ceiling drywall, or plaster.
- The second step to strengthen and brace the gable end is to attach new studs (retrofit studs) next to the studs already in the gable-end wall because existing gable-end studs are usually not strong enough.
- The third and final step in strengthening and bracing the gable end is to connect the retrofit studs to the horizontal braces by using straps and compression blocks. Completing these steps strengthens the wall and ties it into the roof structure so that it is a much stronger unit.
The second activity is strengthening the wall-to-wall connection: This activity focuses on connecting the gable end wall to the exterior wall below by connecting the wall below to the reinforced gable-end wall with straps, brackets, or screws between them to make a strong connection. A good connection between a strengthened gable-end wall above and the wall below will help strengthen the lower wall by keeping the top of it from moving, thereby making the home’s whole end wall much stronger and better able to resist wind loads. You will need to determine which kind of connection (straps, brackets, screws, etc.) is appropriate when you evaluate the gable end.
Conclusion: The types of walls and way the walls are connected will determine whether strengthening and bracing the gable end or strengthening the wall-to-wall connection should be done first. If the gable-end wall is a conventionally framed wall and the wall studs are merely toe-nailed in place, then you should install straps or right-angle brackets to anchor each of the studs longer than 3’ to the upper and lower framing members. If you attach the studs to the top and bottom plates using brackets that must be nailed to the top and bottom plates’ edge, they must be installed before the horizontal braces are installed.
Where do I start?
Contact a licensed, bonded, and insured contractor to perform end bracing and strengthening retrofits.
More Resources:
- FLASH. Resilient Design Guide: Concrete Construction Edition.
- FLASH. Volunteer Guide Mitigation For High Wind Events.
- FEMA. Brace Gable End Roof Framing.
- FEMA P-804. Wind Retrofit Guide for Residential Buildings.
- Hurricane Retrofit Guide. Gable End Overhangs.
- South Carolina Safe Home. Gable End Bracing.
Why do they matter?
Your home’s ability to resist extreme wind forces is only as effective as its weakest link, and the most effective way to create a hurricane-resistant home is to secure all connections starting with the roof-to-wall connection.
The roof is your home’s first line of defense from a storm. To make sure the roof stays in place when severe winds blow, securely anchor roof-to-wall connections by installing metal connectors (hurricane straps or clips) or screws at every wall-to-rafter connection. Keep in mind “hurricane straps” is jargon for the connection that is made between the roof and wall structural members, but this same connection also enhances the structure against other high winds, such as those from tornadoes.
What do I need to know?
Wall connectors and straps
- For existing construction, the easiest time to add hurricane clips is during re-roofing. If re-roofing your existing home is years away, it is possible for professional contractors to reinforce an existing home’s roof-to-wall connections with hurricane straps and clips. This is often accomplished by removing soffits to access the connections. These connections are critical in holding your roof together and will dramatically increase your home’s overall resistance to wind.
- Along with roof-to-wall connections, all joints in your home (floor-to-floor and wall-to-foundation) must also be secured to create a “continuous load path” to transfer wind loads to the building’s foundation.
- Secure floor-to-floor connections by making sure each floor in your home is connected to the floor below with straps or clips in addition to any other code-required nailing schedule for wall sheathing or wood frame walls.
- Wall-to-foundation connections should be made through the use of anchor bolts or mud-sill anchors.
- Install all connectors following the manufacturer’s installation specifications.
Why Does it Matter?
Decades of post-storm damage investigations after hurricanes, tornadoes, and severe thunderstorms reveal that more than 90% of house damage in severe wind events begins when garage doors separate from their mounting, collapse, or cave in due to wind pressure and/or windborne debris impacts. The doors are critical because they cover your home’s largest and weakest opening.
The good news is that the National Institute of Standards and Technology (NIST) analysis and key post-tornado academic and other post-hurricane damage investigations indicate that strong, reinforced garage doors can serve a vital and protective role in severe winds. NIST found that homes with intact garage doors following a severe wind event are more likely to retain their roofs and the walls adjacent to the garage. The correlation between intact garage doors and undamaged roofs remained effective at wind speeds up to 135 mph. This means that in a low Category 4 hurricane or a high EF-2 tornado, keeping your garage door in place can protect your home from costly, progressive damage and even total destruction.
What do I Need to Know?
What makes one garage door stronger than another?
- Metal thickness (gauge) of the door to resist pressure and impact of windborne debris.
- Number and strength of mounting brackets, mounting boards, hinges, and connectors holding the door and track to the wall and the ceiling.
- Horizontal struts that strengthen and reinforce the door against buckling.
- Locking mechanisms on the sides to help keep the door in place in high wind events.
What type of doors are best for high-wind locations?
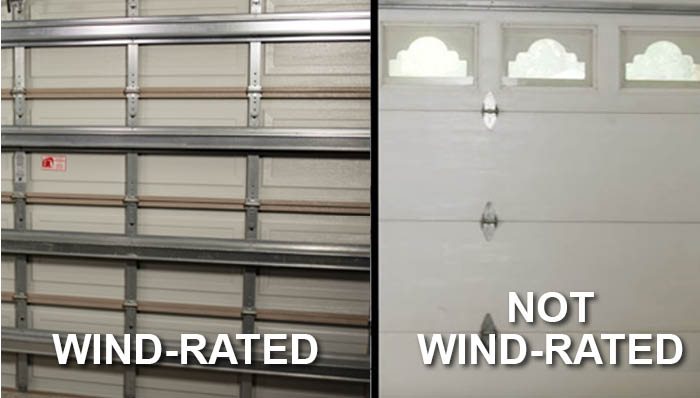
- Wind-rated and impact-resistant doors that are tested and approved for use in your location. Wind-rated is good. Impact-resistant is better.
- Single-car garage doors usually resist wind forces better than two-car garage doors.
- Doors without glass or glazing are better than those with glass or windows unless the glass is impact-resistant.
How do you know if your garage door is impact-rated or wind-rated?
Determining whether garage doors are wind-pressure rated or impact-resistant can be challenging without proof-of-compliance labeling (typically a yellow or white sticker listing pounds per square foot, or PSF).
If your door does not have a sticker, take a picture of your door and contact a local garage door dealer or the manufacturer for assistance.
Where do I Start?
Strengthen your existing garage door through regular maintenance and enhancements
- Contact a local garage door or certified garage door installer for an annual garage door “check-up” including:
- Inspect the mounting brackets and connectors and make sure the screws are tight, and the track is not loose.
- Add mounting brackets and connectors if you only have three on each side.
- Replace rusted pins or worn-out rollers, and make sure they are balanced.
- Verify the lifting system functions as designed, especially if you modify the mounting.
Note: It is essential to have a licensed and insured garage door professional perform this work to preserve door balance and the performance of safety protections.
Replace and upgrade your garage door with a wind-rated or impact-resistant version
- Contact a garage door distributor or dealer and consider purchasing a wind-pressure-resistant or impact-resistant garage door.
- The costs will vary depending on the type of doors you choose and the installation cost where you live. However, you can expect to spend as little as $500 more for this type of door than for a non-wind-pressure-rated or non-impact-resistant door.
Note: Your home insurance company may offer annual discounts for these types of garage doors.
Build temporary, Do-It-Yourself 2-by-4 wood braces to reinforce your non-wind-rated door before a hurricane arrives
- This is the lowest-cost solution and will cost approximately $150 for materials plus more for installation unless you are handy and have the necessary tools for the job.
- Do not forget to release the lift system when you have temporary panels in place. This will avoid accidental deployment and potential damage if you use the garage door opener while the panels are in place.
Note: This is an emergency, temporary measure and should only be used when a National Hurricane Center hurricane watch or warning is in effect.
Release your lift system and deploy lock your garage door locks ahead of expected severe wind events, including hurricanes and tornadoes
- If your door has locks on each side, you can use them to increase your wind resistance ahead of the storm.
- If you are leaving for an extended vacation, deploying your locks can provide additional home security value.
Note: Not all garage doors include locking mechanisms, but a certified garage door professional can add them for a modest cost.
Why do they matter?
Your exterior walls, doors, and garage doors serve as part of the protective shell of your home. If the shell breaks during a hail, hurricane, tornado, or another high-wind event, wind can enter your home and allow pressure to build on the roof and walls, often leading to damage.
Doors are one of the weakest parts of the wall, so they must be designed and installed correctly to keep wind and wind-driven rain out of a home. It is important to determine your door’s potential performance by knowing how much wind load it is designed to carry and evaluating whether it is wind or impact-rated.
Reviewing the relative strengths and weaknesses of your doors is one of the essential steps you can take to increase your home’s strength in a hurricane or other natural disaster.
What do I need to know?
Here are some questions to ask when evaluating your exterior doors and their ability to resist wind and water damage.
- What is the overall strength of the door? What is the wind rating, or highest level of positive (pushing) or negative (pulling) pressure, that it is designed to handle before breaking? Door glass panels have their own type of design pressure (DP) and impact ratings, although the ratings are very similar to window ratings.
- Is the door impact-resistant and tested to withstand debris like flying limbs or other windborne missiles so common in hurricanes?
- Which direction does the door swing? Outswinging doors enjoy more wind resistance as they have the frame’s extra muscle to help resist wind pressure.
- How is the door anchored to the door frame, and how closely spaced are the anchors?
- How is the door connected to the wall frame, and how deeply do the connections extend into the wall?
- What is the throw length and width of the deadbolt? Does it extend well into the door or wall frame?
- Does the door have glass inserts or panels? If so, are they wind- or impact-rated? If not, you will need to protect it to keep wind and water from entering your home. Is your door a single or double-entry type? While attractive, double-entry present some unique considerations in high winds:
- Double-entry doors typically consist of an “active” door used when only one door is needed and an “inactive” door that usually remains closed but can open when necessary.
- Double entry doors are not as strong as a single door because the frame around them is more spread out, providing less wind resistance and making them more susceptible to wind pressure and damage.
- There are steps you can take to strengthen double-entry doors.
- Reinforce double-entry doors by adding a heavy-duty deadbolt or replacing the existing deadbolt with a longer, stronger one.
- Add slide bolts at the top and bottom of the inactive door. Replace the existing hinge attachment screws in the doors and door frame with longer screws that extend further into the doors and frame.
Here are some typical areas where doors can fail:
- Latch and Lock – this is a common weak point on doors as high winds can concentrate powerful forces at that single point. Many new door models feature three- and five-point latching vs. a traditional single-point latch and handle as they create a stronger door-to-doorframe connection.
- Hinges – the hinge side of the door is another potential weak point, so hinges require specific attachments to the doorframe and door to create a strong connection.
- Jamb and Frame-to-Wall – the door jamb and frame must be attached correctly to the structure to avoid door system failure, so follow the door manufacturers’ detailed specifications when you attach the system to the home.
- Threshold – the threshold is the bottom of the door frame and provides the transition from outside to inside and can be particularly vulnerable to wind-driven water. Sealing the bottom of the threshold to the door frame is essential and is often overlooked during installation.
- Flashing – Doors should be properly flashed and sealed for both wind and wind-driven rainwater. All four sides of the door should seal tightly to the frame and seal tightly to the structure.
Here are some things to keep in mind as you evaluate your doors:
- You can protect entry doors with an impact-resistant covering or by choosing using an impact-resistant door.
- You can protect doors further by covering the door opening with temporary plywood covers bolted to the door frame. This can be especially helpful if the doors contain glass panels.
- One or more entry doors should be operable from inside the living space even while opening protection is in place to ensure safe entry and exit.
- If your doors are old or damaged, consider replacing them with stronger doors by checking with home improvement stores or lumber yards.
- Heavy-duty deadbolt locks can provide extra strength for your doors as they have thicker and longer bolts, heavier strike plates, and heavier mounting hardware. Locksmiths, home improvement stores, and hardware stores can help you select and install stronger locks and slide bolts or other devices designed to strengthen and secure your doors.
- Impact-resistant doors will often have a tag or label on the edge of the door. Do not remove or paint over this label.
Where do I start?
Replacing or retrofitting your doors
- Check with your local building department for information about the wind speed rating and any possible impact rating requirement your doors should meet.
- If you would prefer not to reinforce or replace your existing doors by yourself, you can hire a professional. Home improvement, supply stores, and lumberyards often offer installation services.
More Resources:
- FLASH. Resilient Design Guide: High Wind Wood Frame Construction Edition
- FLASH. Resilient Design Guide: Concrete Construction Edition
Why do they matter?
The roof covering is one of your house’s first and most important defenses against hurricane winds and wind-driven rain, and unfortunately, it’s also often the weakest part of the roof.
What do I need to know?
- Common residential coverings include asphalt shingles, concrete and clay tiles, and metal panels.
- High-wind rated shingles, metal roof or metal panel/standing seam metal roof system, or concrete and clay tile are resilient roof coverings when installed along with the proper connections per manufacturer’s instructions for increased wind loads.
- Many hurricane-prone areas are also prone to hail. Look for wind and impact-rated roof coverings to protect roof coverings from wind and hail damage.
Types of roof coverings
Asphalt shingles
Two of the most common causes for damage to asphalt shingle roof coverings in high-wind events are improper installation and use of shingles that are not rated for the wind speeds identified in the building code. It is essential to understand the wind-resistance ratings and special installation methods for asphalt shingles in high-wind, coastal regions.
Pros:
- Relatively low cost, lightweight, and easy to install
- Good fire resistance (usually Class A)
- UL 2218 Class 3 and 4 impact resistance is available and should be used in hail regions
- Available with wind warranties up to 130 mph if installed per manufacturer’s high-wind requirements
- Asphalt shingles should be installed following FEMA 499 Technical Fact Sheet No. 7.3, which explains asphalt shingle installation, wind-resistance ratings, and weathering and durability
Cons:
- Aging and weathering may decrease effectiveness in high winds and impact resistance
Considerations:
- If you have an old roof replaced, your contractor should remove the existing shingles and underlayment rather than install new shingles. This approach allows the contractor to inspect the sheathing and make any needed repairs.
- For the highest level of wind-rated shingle, look for shingles that are rated to ASTM D3161 Class F or ASTM D7158 Class H. For the highest level of impact protection, look for shingles that meet UL 2218 Class 4.
- Nails for homes within 3,000 feet of saltwater should be hot-dip galvanized or stainless steel.
- Use six nails per shingle for three-tab shingles and follow manufacturer’s instructions when using architectural shingles.
- Ensure the shingles do not extend more than ¼” beyond the roof’s edge for a square drip edge.
- Your roofing designer should obtain manufacturer information on bond strength and nail pull-through resistance, and use products with the upper ranges of available strengths.
Metal
Pros:
- Attractive and relatively lightweight
- Last up to 40 years
- May have a Class A or B fire rating
Cons:
- Typically more expensive than asphalt shingles
- Cosmetic damage from hail may cause permanent dimples
Considerations:
- If installing a metal roof system, FEMA 499 Technical Fact Sheet No. 7.6 provides guidance on selecting and installing panel or shingle system.
- For metal roofs, use clips or cleats instead of exposed fasteners because they aren’t exposed to weather and they allow the metal to expand and contract reducing the opportunity for buckling
- If exposed fasteners are used on metal roofs, they should be corrosion resistant and penetrate the sheathing
Slate
Pros:
- Can last three times longer than shingles
Cons:
- Expensive and very heavy
- Some roof structures are unable to support slate
- Additional installation cost
Tile
Pros:
- Popular in some areas
- Available in concrete or clay
- Concrete tiles are more durable and can last more than 30 years
Cons:
- Performance in hail storms varies by type
- Clay tiles are brittle and can be easily chipped or broken
- Tiles are heavy, and some structures are unable to support the weight
- Can take longer to install making labor costs more expensive
Considerations:
- On tile roofs, use wind clips or storm anchors in high wind or seismic areas
- On tile roofs, two screws per tile give the highest wind uplift resistance and will help the tile resist shifting.
- Installation is critical in high wind areas when using clay or concrete tile, especially on the hip and ridge tiles
Wood shingles and shakes
Pros:
- Made from cedar, southern pine, or other woods
- Attractive appearance
- Perform moderately well against hail
Cons:
- May not be fire-rated unless treated with a fire retardant
- Some local codes limit their use
All other roof coverings
- All roof coverings, regardless of type, should be installed in accordance with the manufacturer’s installation instructions for the appropriate design wind speed.
Where do I start?
- Contact a licensed roofer in your area to evaluate your existing roof and determine what can be done to make it more resilient.
- Check local code requirements for roof repair or replacement criteria. Your local building official should be able to provide additional recommendations.
More Resources:
- FLASH. Resilient Design Guide: High Wind Wood Frame Construction Edition.
- FLASH. Volunteer Guide Mitigation for High Wind Events.
- FEMA. Secure Metal Siding and Metal Roofs.
- FEMA. Secure Composition Shingle Roofs.
- FEMA P-804, Wind Retrofit Guide for Residential Buildings.
- National Roofing Contractors Association (NRCA) Steep-Slope Roofing Manual
Why do they matter?
If you do not have wind or impact-resistant skylights, you may want to consider replacing them with newer models that are tested and approved to resist wind pressure, windborne debris impacts, and hail.
What do I need to know?
The best time to replace skylights is during re-roofing. Removing the old roofing material will provide easy access to replace the skylights with wind- and impact-rated types that do not need any additional coverage in high-wind events like hailstorms, hurricanes, or tornadoes. This is important as it is not only inconvenient to cover skylights before a hurricane, but it is nearly impossible to protect them before a hailstorm or tornado strike.
Where do I start?
Replacing your skylights
- Check with your local building department for information about the wind speed rating and windborne debris protection requirements your skylights should meet.
- Be sure to follow the manufacturer’s specifications when using or installing skylights as improper installation may cause a voided warranty or, worse, a product failure that presents a threat to life and property. Learn more about installing windows and skylights here.
- Select skylights that meet the Design Pressure (DP) ratings for your location.
More Resources:
- FEMA P-762, Local Officials Guide for Coastal Construction. Chapter 10: Windows, Doors, and Opening Protection.
Why do they matter?
A sealed roof deck provides a secondary water barrier or a supplemental way to keep wind-driven rain from coming through the deck joints or seams when the primary roof covering (shingles, etc.) and traditional underlayment are damaged, detached or blown away in severe weather. Insurance Institute for Business and Home Safety research indicates that a sealed roof deck can prevent as much as 90% of wind-driven rain from coming through deck joints and entering your attic. This keeps the equivalent of nine bathtubs of water per minute from seeping through your ceilings and causing costly damage.
What do I need to know?
Roof decks are made with plywood, oriented-strand board, or engineered wood panels with an integrated, water-resistive barrier.
Panels are spaced slightly apart to allow the wood to expand and contract (move) in heat or cooling conditions.
There are four ways to seal your roof deck:
- Cover deck panel seams with self-adhering modified bitumen flashing tape or flexible flashing tape.
- Attach a second layer of either Type II (#30) or Types III and IV (#30) felt underlayment secured with button cap nails spaced at 6” along the edges and 12” in the field.
- Apply a complete layer of a self-adhering membrane (ice and water shield) across the entire roof deck.
- Apply closed-cell polyurethane spray foam adhesive on the underside of the roof deck inside the attic.
Note that some state building codes now require sealed roof decks for new and replacement roofs.
Where do I start?
- Ask your roofer to seal your roof deck and create a secondary barrier water during new construction or when re-roofing so your deck will be protected when exposed to wind-driven rain.
More Resources:
- Strong Homes – Roof Underlayment Explained (from our YouTube site).
- FEMA P-804, Wind Retrofit Guide for Residential Buildings.
Why do they matter?
You may have heard the term hydrostatic vent, or more commonly, flood vent. These vents allow flood water to pass through walls and equalize the standing water pressure known as hydrostatic pressure on each side of a wall. If the vents are not present to allow the water to pass through and the pressure to equalize, the wall could be knocked over from the weight and force of the water only on one side.
What do I need to know?
- These vents or openings allow the entry and exit of floodwaters.
- The term vent can be slightly confusing as it does not have to be an actual mechanism and can just be an open hole in the wall. Mechanical style vents are sometimes used to make the opening more aesthetically pleasing as well as provide a means of automatic opening and closing to prevent insect entry. Some vents are insulated to prevent cold air from entering the vented areas.
- The openings must be installed BELOW the expected flood level to be effective.
- The goal is to allow water to enter and exit the structure at roughly the same rate to maintain equal exterior and interior hydrostatic pressures on the wall.
Some basics on hydrostatic vents
- Hydrostatic vents allow the flood waters to pass through the walls without causing hydrostatic pressure on the walls.
- Vents are calculated by having one square inch of vent space per one square inch of floor area.
- Vents can only be used in the parts of your home that you don’t live in, such as the garage, storage areas, or crawlspace.
- The vents must have the bottom of the vent installed within one foot of the adjacent grade, and they must be installed in at least two different walls.
- The vents work automatically and therefore cannot have any covers over them unless the covers work without manual assistance.
- Verification of the hydrostatic vents is done by a professional surveyor and reported on the Elevation Certificate (EC). The EC provides information such as the number and location of the vents and the total number of vented space in square inches, installed on the home.
- The installation of hydrostatic vents may provide some flood insurance savings.

Where Do I Start?
- Contact your local floodplain manager to determine if there are any special considerations in the local floodplain ordinance where you live for the use of hydrostatic vents.
- A licensed contractor can install flood vents in your home following the prescribed calculations; however, you will need a licensed surveyor to provide you with an Elevation Certificate (EC) that documents the number of vents and square area covered. Your local floodplain manager can provide more information regarding the EC.
More Resources:
- FEMA. National Flood Insurance Program Elevation Certificate and Instructions.
- FEMA 259, Engineering Principles and Practices of Retrofitting Flood-prone Residential Structures.
- FEMA P-312, Homeowner’s Guide to Retrofitting 3rd Edition (2014).
- FEMA 551, Selecting Appropriate Mitigation Measures for Floodprone Structures.
- FEMA. Technical Bulletin 7, Wet Floodproofing Requirements (1993).
Why do they matter?
Balconies and decks are attractive features of a home, but they also add to the weight and earthquake loads during an earthquake.
What do I need to know?
There are three things to focus on when evaluating your balconies or deck’s resistance to earthquakes:
- The effect of additional floor area
- Anchorage for earthquake loads on your home
- Vertical support
Additional floor area
- The addition of a balcony or deck creates additional weight and increases the earthquake load on your home. Consider the added loads if a balcony or deck was not part of your original house design.
- Balconies and decks can concentrate the added earthquake load on one side of the house and one braced wall line. This can contribute to rotational behavior and concentrations of damage.
- Balconies extending more than 6 feet past the exterior house wall typically require engineered design.
- For larger balconies and decks, consider separating the balcony or deck from the home by providing a gap to permit independent movement of the balcony or deck.
Anchorage for earthquake loads on your home
- If your balcony or deck is laterally supported by your house, adequate connection to the house is key to good earthquake performance
- Ensure that your balcony or deck is adequately fastened to the floor sheathing or floor framing, and that there is blocking where the cantilever bears on the exterior wall.
Vertical support
- Vertical load connections and moisture and decay are two important considerations related to the vertical support of decks and balconies.
- A history of deck collapses in the U.S. has proven that inadequate connection between the house and the deck is a serious concern. Make sure that your vertical load connections are sufficient.
Where do I start?
- Visually inspect your balcony or deck to determine its condition. If you are unsure of its condition, consult an engineer to determine its structural stability.
- Ensure all handrails and stairs are structurally strong and in good condition.
- Ongoing maintenance of balconies and decks is important to maintaining their structural integrity.
- Design the joints of exterior decks so that moisture will not collect in the connection area.
- If a new balcony or deck is to be added to the home, consult an engineer to ensure it is earthquake-resistant.
More Resources:
- FEMA 232, Homebuilders’ Guide to Earthquake-Resistant Design and Construction.
- FEMA E-74, Reducing the Risks of Nonstructural Earthquake Damage—A Practical Guide.
- FLASH, Buyer’s Guide to Resilient Homes, Earthquake Disaster-Specific Checklist.
Why do they matter?
The walls, roof, windows, and doors of your home are important components that keep the heat in and cold air out. During winter, insulation should prevent heat from escaping your home. Also, preventing ice dams is key to avoiding significant damage to your roof and attic.
What do I need to know?
- Heat can be transferred through the roof and into the attic area.
- The living areas of your home may lose heat if there is not enough insulation in the ceiling area where the living space meets the attic.
- Insulation is measured by its R-Value, or its measurement to resist heat flow. The higher the R-value, the greater the insulating ability of the material.
- Small gaps in door weatherstripping can allow significant warmed air out of your home and cool air into your home.
- Failed or missing caulking around window frames can allow cold and moisture from snow and ice to enter your living space.
- Ice dams are formed when air in the attic is warm enough to cause snow and ice on the roof to thaw and refreeze repeatedly. Pools of water then become trapped under layers of ice that seep under your roof covering (tiles or shingles) into the attic.
Where do I start?
- Caulk any gaps around window frames.
- Replace missing or damage weatherstripping around doors.
- To prevent ice dams:
- Keep the warm air downstairs where it belongs with sufficient insulation on the floor of the attic. Consider also using a dehumidifier to control water vapor.
- Seal all openings that would allow vapor to rise into the attic, including any holes created from installing light fixtures and ceiling fans.
- Provide good attic ventilation to replace warm air in the attic with cold outside air.
- Where possible, install insulation in wall cavities to prevent heat from leaving the inside of your home. Remember, the higher the R-Value number, the better the insulation.
- If replacing windows, consider the energy rating of the windows and how well they will insulate during the winter months.
- Keep gutters free of debris.
- Fix any leaks in your roof.
- Don’t climb up on the roof to remove the snow. You could cause significant damage to your roof coverings, not to mention yourself if you were to slip and fall.
- Don’t install large pieces of equipment in the attic. This will only raise the temperature in the winter months.
- Don’t use salt or other minerals to melt the snow on your roof. These are very damaging to roof shingles and tiles, as well as gutters and downspouts.
- Hire a contractor to inspect your attic before winter to determine whether proper insulation and weather guards are in place.
- Have your roof inspected to ensure it is also prepared for any snow or ice that might accumulate during winter.
Why does it matter?
Closed-cell spray polyurethane foam insulation applied to the underside of the roof deck can seal your deck, create a secondary water barrier, strengthen the roof deck connections to increase wind resistance, and improve energy efficiency.
What do I need to know?
Spray foam adhesive comes in two forms: closed or open cell. While both provide a measure of increased R-value and wall insulation, closed cell provides better heat resistance, second water barrier benefits, and enhanced strengthening properties that reinforce the roof deck attachment.
- Properly applied spray foam adhesive is an impermeable insulation. Controlled air permeability helps to prevent and control bulk water entry, and this creates a sealed roof deck.
- Spray foam adhesive serves as a secondary water barrier to keep water out of your attic.
- Spray foam provides support against wind uplift and racking by making connections stronger.
- Spray foam saves energy by increasing R-value.
Where do I start?
Identify a licensed, bonded, and insured professional who is certified to install spray foam. Apply a 3” minimum, full insulating layer of closed-cell polyurethane foam adhesive between roof rafters/trusses and on the underside of decking at all points of framing and sheathing intersections.
More Resources:
- FLASH. Resilient Design Guide: High Wind Wood Frame Construction Edition