Once you and your family are prepared, consider extended family members or friends who are especially vulnerable during disasters. Pay special attention to folks with financial limitations and seniors.
You can help your broader community before, during, and after disasters by volunteering. Find an organization in your community, and participate in a class, training, or discussion. Affiliate with the organization before disaster strikes.
Local nonprofits, faith-based organizations, schools, and civic groups are all great places to begin your search. There are many ways to help your community, including delivering food to older adults or organizing your own community project. Consider any special skills you may be able to offer.
Get training in CPR and basic first aid, as well as other hazard-specific training. A financial contribution or gift to a recognized nonprofit disaster relief organization is always an effective way to support disaster recovery, and even small amounts can make a big difference.
Here are some options to get you started to support community disaster resilience:
- Join your local Community Emergency Response Team (CERT) program. CERT programs are typically sponsored, affiliated, or created in partnership with a local fire department, law enforcement agency, or emergency management agency. Get CERT trained in basic disaster response skills, such as fire safety, light search and rescue, team organization, and disaster medical operations.
- Find a volunteer opportunity with your state’s Voluntary Organizations Active in Disaster (VOAD). National VOAD is an association of organizations that mitigate and lessen the impact of disasters.
- Don’t forget the crucial role youth play in disaster preparedness. Get resources to integrate children and youth into family and community disaster preparedness.
Where will your family or household be when disaster strikes? If you are not together when an emergency happens, will everyone know how to stay in contact — even if cell towers are down and phones don’t work? Do you have a meeting place and will everyone have a way to get there?
To develop a family disaster plan, start by mapping out contact methods and meeting places. Then share and practice your plan with your family or household and out-of-town contact. While you develop your plan, keep in mind these specific household needs:
- Ages of household members
- Medical needs like prescriptions and equipment
- Disabilities or access and functional needs
- Dietary needs
- Pets or service animals
- Languages spoken
After you make your plan, all you need to do is revisit and communicate your plan regularly so you’re ready when disaster strikes.
Build your plan
- Write it down.
- Create a document with the contact information for your family, close friends, designated out-of-town contact, employers, and other service providers like doctors, schools, etc.
- Plan to communicate.
- Plan how to communicate with family or friends when disaster strikes.
- Discuss the benefits of calling, texting, emailing, or using social media. Texting tends to work more reliably than calling, especially when systems are in high demand.
- Determine how your family will receive emergency updates and alerts.
- Choose a meeting place.
- Pick two places to meet your family or household members.
- Meet outside your home in case of a sudden emergency or at a friend’s or neighbor’s house in case you can’t return home.
- Ensure that these places are reachable for those with access and functional needs and that your pets are welcome.
- Share the address and phone number for each of your meet-up locations.
- Add the information to your phone’s contacts and list them in your plan.
- Plan to evacuate.
- If an evacuation is necessary, determine where you will evacuate and how you will get there.
- If you plan to shelter-in-place, identify the safest location in your home to shelter during a disaster.
- Identify emergency contact(s).
- Ask an out-of-town family member or friend to be your emergency contact.
- Ensure everyone in your household knows the contact’s name, location, phone number, email, and any social media contact options.
- Schedule a meeting.
- Set a meeting with your household to talk about the types of disasters and hazards you might face.
- Work together and share responsibilities as a team.
Know your plan
Send links to your disaster plan and make copies for all family or household members and emergency contacts. Post a copy in a prominent place in your home like a bulletin board.
Practice the plan
Regularly gather your family or household members to review and practice your plan. Discuss what information you would communicate during a disaster and send practice messages. Make sure all family members (including children) understand how and when to call 911.
Update your communication plan at least once a year or whenever information changes.
Special Considerations for Families with Children
A natural disaster is often devastating for adults, but children can be especially vulnerable to stress and anxiety when disaster strikes. Prepare your children before a disaster and plan activities to keep them busy during and after an emergency.
Getting kids involved in the planning process and letting them plan activities will distribute the workload and give your family a sense of control.
Preparing Your Children for Disasters
- Learn what types of emergencies are possible where you live, teach your children about them, and discuss the steps you’ve taken to protect your family and home.
- Discuss emergencies that may require evacuation, such as a hurricane, and shelter-in-place emergencies, such as a tornado.
- Include your children when creating your family communication plans and building a disaster supply kit.
- Have a disaster drill and practice your plan, making sure to give your children a role and way to participate.
- Prepare fun, kid-friendly activities and games to keep them occupied. Choose games that they do not ordinarily play, so they have something special to enjoy.
- Select activities that do not require power so you can conserve your batteries and back-up power sources.
More Resources
- FEMA. Create Your Family Emergency Communication Plan.
- Ready. Make a Plan.
- Ready. Kids.
Pets are cherished family members, so it’s essential to plan for their safety and comfort as a part of your comprehensive family disaster plan.
Take inventory of your supplies and review all records periodically so your pet can be safe and cared for during any disaster.
Consider these options for your pet’s location during a disaster.
- Take your pet with you to a friend’s or family member’s house or a hotel outside the threat zone. Make arrangements ahead of time to avoid last-minute surprises and confusion.
- Keep your pet with you in a secure, storm-prepared shelter location. Find evacuation shelters that accept pets ahead of time. While many shelters will accept pets, some can only accommodate service animals or certain types of pets like dogs.
- Leave your pet with a friend in a safe zone or make boarding arrangements with a veterinary clinic or kennel. Talk to the kennel about advance registration and requirements like shots.
- Create a safe, quiet, and comfortable space in your home for your pet. Never leave them alone or behind.
Keep your pet prepared at all times.
- Portable carrier (large enough for the pet to stand up and turn around)
- Extra leash, collar and ID tag
- Pet food: At least 2 weeks of dry food in a water-tight container or canned food (include a manual can opener)
- Water: At least 2 weeks of clean water (large dogs need 1 gallon per day)
- Up-to-date health and immunization records
- Medications (flea and tick preventative, a two-month supply of heartworm prevention medication, all prescription medications)
- Litter/newspapers for clean-up
- Toys and treats
- Towels
- First aid supplies
- A recent photo of you with your pet
How to prepare large animals for a disaster
Prepare your large animals such as horses, cattle, sheep, goats, or pigs before a disaster using the following tips from FEMA:
- Ensure all animals have some form of identification.
- Evacuate animals whenever possible. Map out primary and secondary routes in advance.
- Make vehicles and trailers needed for transporting and supporting each type of animal available. Make sure experienced handlers and drivers are also available.
- Ensure destinations have food, water, veterinary care, and handling equipment.
- If evacuation is not possible, animal owners must decide whether to move large animals to shelter or turn them outside.
Take the extra time to observe livestock, looking for early signs of disease and injury. Severe cold-weather injuries or death primarily occur in the very young or in animals that are already debilitated.
Animals suffering from frostbite don’t exhibit pain. It may be up to two weeks before the injury becomes evident as the damaged tissue starts to slough away. At that point, treat the injury like an open wound, and consult a veterinarian.
Make sure your livestock has the following to help prevent cold-weather problems:
- Plenty of dry bedding to insulate vulnerable udders, genitals, and legs from the frozen ground and frigid winds.
- Windbreaks to keep animals safe from frigid conditions.
- Plenty of food and water
More Resources
- Ready. Pets and Animals.
Nearly every home is susceptible to power outages caused by disasters. Some disruptions last for days, even weeks. Electrical power loss can create unhealthy and unsafe living conditions or building damage.
Taking steps to prepare before a power outage is the best way to maintain your family’s comfort and avoid danger, costly losses, or damage to your home. Learning how to protect food, prevent mold growth, safely use generators, prevent carbon monoxide poisoning, and avoid house fires when power returns are all essential parts of your power outage preparedness plan.
Evaluate and secure different backup power options ranging from small backup batteries and solar charging options to portable or standby generators with an automatic switch.
Before a Power Outage
Prepare for a power outage
- Keep a disaster supply kit handy with water, nonperishable foods, medicine, printed copies of essential documents, baby supplies, pet food, and more.
- Maintain a supply of cash as ATMs may not operate, and businesses and restaurants may be unable to accept debit or credit cards.
- Maintain a supply of flashlights, batteries, hand-crank cell phone chargers, battery, and solar-powered radios.
- Identify an alternative power supply for any family members who are dependent on electric medical equipment.
- Consider purchasing a portable generator and learn how to use and ventilate it safely before an outage occurs.
- Consider purchasing and installing a standby home generator with an automatic switch.
- Keep your landscape trimmed and clear of dead or weak branches to prevent power loss from downed trees and limbs.
Consider evacuation needs
- Keep your gas tank full or nearly full at all times as gas stations rely on electricity to power their pumps. If you use your car to charge your devices, never leave it running inside a garage, partially-enclosed space, or near a home.
- If your garage door opener is electric, know how to locate and use the manual release lever. Understand that you may need help to lift the garage door due to weight. If you ordinarily enter your home through the garage, make sure you have an alternate way and key to enter if the garage door won’t open.
- Learn about state or local emergency plans detailing the closest cooling and warming shelters. If the temperature is extremely hot or cold outside and the power outage is expected to last for a long time, consider relocating temporarily to a site with heating or air conditioning.
Protect electronics
- Back up your computer files and operating systems regularly. Consider extra batteries and a power converter for your laptop.
- Turn off all appliances and electronic devices when they’re not in use to protect them from power surges.
- Use a high-quality surge protector for all high-value electronics. If you use a computer frequently, consult your local computer equipment dealer about an uninterruptible power supply (UPS).
- If your telephone requires electricity, such as a cordless phone or answering machine, plan alternate communication options, including a regular telephone handset, cell phone, radio, or pager.
- Ask remote service providers if they have backup power systems and how long those systems will operate. Some voicemail systems and remote computer dial-up servers may not work if power is out in their location, even if your power is uninterrupted.
Plan for people with disabilities
- If you need electricity to operate medical equipment in your home, plan with your doctor, health care provider or local emergency management office.
- Charge devices and extra batteries to maintain power to your equipment during electric outages.
- Contact your power company if you use oxygen or mechanical ventilation. Find out what you can expect in a power outage.
- Sign up for automatic power company alerts to stay aware of planned or unplanned power outages and power restoration.
- Plan how you will maintain power during an outage if you cannot be without it. Consider using a backup battery, a generator, solar energy or other alternate electrical resources. Consider how you will keep your medications refrigerated.
During and After a Power Outage
- Keep your use of electricity minimal by practicing energy conservation measures to help power companies avoid imposing rolling blackouts.
- Use sewage check valves and backflow preventers on your home to guard against contamination. Electrical power loss can have many secondary effects, including compromised water and sewage systems.
- Use flashlights and rechargeable lamps instead of candles during a power outage. Candles present a fire risk when first responders may be unable to reach you.
- Turn off any electrical equipment that was in use before the power outage, but leave one light on to alert you when power resumes.
- Check on elderly neighbors, friends, or relatives who may need assistance if the weather is severe during the outage.
- During a power outage, resist the temptation to call 911 for information. Use radios, online news sources, or social media channels for updates.
- Be careful when driving through intersections as traffic lights may not be working.
- Once your power is restored, wait a few minutes before turning on major appliances to avoid problems caused by a sharp increase in demand.
Practice food and water safety
During or after a power outage or disaster, your food may no longer be safe to eat. Take precautions to prevent food spoilage, and know when you should dispose of refrigerated food. Food that has not been refrigerated can spoil quickly and cause severe health problems, so you should take all steps to keep it safe. Here’s how the following steps to extend the shelf life of your refrigerated food:
- Turn your refrigerator or freezer to the coldest setting before the power goes out.
- Keep a supply of nonperishable foods, medicine, baby supplies, and pet food on hand.
- Prepare one gallon of water per person per day for at least three days.
- Fill plastic containers with water, leaving about an inch of space in the container, and store them in your refrigerator or freezer as space allows. Storing this water will help keep food cold during a power outage.
- Keep one or more coolers with ample ice to keep your food cold in case a power outage is prolonged. Avoid storing perishable foods above 40℉ for more than two hours.
- Keep the refrigerator and freezer doors closed. If the door is closed, items in a refrigerator will keep for up to four hours. If the door is closed, items in a full freezer will stay frozen for about two days, and in a half-full freezer for about one day.
- Use a refrigerator thermometer to check temperature. For proper food storage, refrigerated or frozen foods should be kept at 40° F or below. Discard any perishable refrigerated foods that have been above 40° F for more than two hours.
- Discard any food with an unusual odor, color, or texture. Remember: “When in doubt, throw it out.”
- Food exposed to wildfire can be unsafe from the heat of the fire, smoke fumes, and chemicals used to fight fire.
How to Safely Use a Generator
You can also make your home resilient to power loss by using a combination of power generation options from basic to sophisticated. Then you can provide backup power for lighting, food preservation, limited air conditioning, prevention of mold growth on interior finishes, and much more.
Consult a licensed, professional electrician to evaluate your generator purchase options. Two kinds of generators can generate emergency power in your home: permanently installed standby or “whole house” generators, and temporary, portable generators.
Ensure your generator is properly ventilated. Improperly ventilated generators can cause deadly carbon monoxide fumes to build up. The fumes are odorless and are often fatal.
- Understand the primary hazards to avoid when using a generator: carbon monoxide
- (CO) poisoning from the toxic engine exhaust, electric shock/electrocution, and fire.
- Follow manufacturer instructions before using a generator to learn about safe usage like proper grounding.
- Consult relevant federal, state, and local regulations to see if you need a permit.
- Before you operate your generator, disconnect the regular source of power to your home. Hire a qualified electrician to install the correct equipment that meets local electrical codes, or ask your utility company to install an appropriate power transfer switch.
- Use gas-powered generators only in well-ventilated outdoor areas. Always operate the generator outdoors and away from open windows and doors. NEVER operate it inside, including the basement, enclosed patio, or garage.
- Store fuel for the generator in an approved safety can. Use the type of fuel recommended in the instructions or on the generator label.
- Ask your local fire department if local laws restrict the amount of fuel you may store at your location. Store the fuel outside of living areas in a locked shed or other protected area. To guard against accidental fire, do not store it near a fuel-burning appliance, such as a natural gas water heater in a garage.
- Inspect and maintain your generator regularly. Consider a maintenance contract that provides at least one service visit per year. Keep fresh fuel in the tank, and periodically run the generator to test performance.
- Regularly monitor above-ground storage tanks, pipes, and valves for cracks and leaks and make any needed repairs immediately. Meet any regulatory requirements for tanks.
- Keep the generator dry to avoid electrocution.
- Be sure to turn the generator off and let it cool down before refueling. Gasoline spilled on hot engine parts could ignite.
- Regularly start your generator even when there is not a power outage to ensure that it is working properly.
How to Install and Use a Portable Generator
- Install electric carbon monoxide detectors with battery backups on each floor of your home, including outside each bedroom.
- Follow the manufacturer’s instructions, and use a portable generator only when needed for essential equipment.
- Plug appliances directly into the generator, or use a heavy duty, outdoor-rated extension cord that is rated (in watts or amps) at least equal to the sum of the connected appliance loads. Check that the entire cord is free of cuts or tears and that the plug has all three prongs, especially a grounding pin.
- Adopt an installed transfer switch or connect appliances directly to the generator.
- Only connect individual appliances to portable generators and never plug a generator into wall outlets. Plugging generators into the home’s electrical system can feed electricity back into the power lines. Known as “backfeeding,” this practice puts utility workers, your neighbors, and your family at risk of electrocution.
- Keep generators, gasoline-powered equipment and tools, grills, camp stoves, and charcoal-burning devices outdoors and away from doors, windows, and vents that could permit deadly carbon monoxide to come indoors.
- Keep generators outside and at least 20 feet away from open windows so exhaust does not enter your or your neighbor’s home.
- Never place a generator in your garage.
- Keep the generator dry by operating it only on dry surfaces and when your hands are dry. Do not use the generator in wet or rainy conditions.
- Store fuel for your generator in a cool, dry, well-ventilated place outside your house. Keep any fuel-burning appliances in specially designed containers, and fuel your generator outside.
- Be sure to turn off and cool down your generator before refueling.
How to Install and Use a Standby Generator
- Consult a licensed professional to assist with your selection and installation of a standby generator.
- Choose a generator that is listed and approved by Underwriter’s Laboratories or a similar standards organization. Some jurisdictions require “air quality permits,” so consult a licensed electrician to identify the requirements in your area.
- Install the generator outdoors near the incoming gas service, near the main electrical panel, or on a flat, level mounting area.
- The recommended distance from your home to the generator depends on state and local building codes. A minimum of 20 feet is recommended.
- Position the generator so that the exhaust does not blow on plants or other combustible materials. No plants, shrubs, or other ignitable materials are allowed within 1.2 meters (4 feet) of the exhaust end of the generator set.
- Do not install the generator where exhaust gas could accumulate, seep inside, or draft into a building. Furnace and other similar intakes must be at least 10 feet from the exhaust end of the generator set.
- Do not use the generator near open doors and windows.
- Do not place the generator set near patios, decks, play areas, or animal shelters.
- Do not install the composite mounting pad directly on grass, wood, or other combustible materials.
- Clear all ignitable materials, including plants and shrubs, building materials, and lawn furniture from an area at least 4 feet beyond the exhaust end of the generator.
- In flood hazard areas, place the generator and its control systems above the highest expected flood level.
- In high wind areas, securely mount the generator to a concrete pad according to the mounting instructions in the installation manual.
Turning the power back on
Before your turn the power back on
- Hire a licensed electrician to inspect your equipment before returning it to service if you have standing water or if any of your electrical components are, or were, submerged in water. Carefully evaluate your circuit breaker box to ensure it is not compromised or wet. Replace any wiring that came into contact with salt water.
- Disconnect cord-connected appliances from their outlets until they have been inspected, repaired, and are certified by a qualified professional as safe for use.
- Circuits with permanently affixed appliances like dishwashers should remain off until the circuits and appliances are certified as safe by a qualified professional.
- Heating and mechanical equipment should be inspected by a qualified professional before returning to use if it has been in contact with any water.
- Failing to inspect and certify appliances, equipment, and systems as safe to use can result in life-threatening shock or electrocution and destroy the equipment as well.
How to turn the power back on
- If you are unfamiliar with your home’s electrical systems, contact your power company or a qualified electrician to make your home safe from electrical hazards.
- Follow your power company’s advice and precautions.
- Watch for loose or downed power lines and tree limbs or debris as they may hide an electrical hazard. Treat loose or downed power lines as if they are energized, and report them to the power company, police, or fire department immediately. Warn others of the loose or downed power lines.
- Do not enter a wet or flooded area or building if the power is on.
- If your exterior electrical service equipment has been flooded, have the local power company remove their metering equipment before you enter the building. Explosion, electrocution, or fire can occur if power is restored to flooded metering equipment.
- Turn off electricity at the main breaker or fuse box, even if your community’s power is off. Do not turn the power off or on at the breaker box if you must stand in water to do so; call an electrician. After confirming that the power is off, leave it off until a licensed electrician can inspect and repair the electrical wiring or equipment and a building inspector approves the work.
- Do not go into a flooded basement unless you are sure the electricity is off.
- Do not connect generators used to power a house until after all compromised wiring has been disconnected or replaced.
More Resources
- FEMA Ready. Power Outages.
- To prepare your business or organization for a power outage, download the free Ready Business Power Outage Toolkit to kickstart your planning.
You can enhance your safety and comfort during and after an emergency or disaster by planning to be self-sufficient. By creating an emergency supply kit, you’ll be able to meet your basic needs for food, water, cash, medicines, and other supplies that will last for at least 72 hours.
Once you build and maintain your disaster supply kit, you have a way to meet your family’s basic needs during a difficult time. This also helps your community by allowing emergency officials and first responders to focus on those who cannot help themselves. Make sure to make your disaster preparedness plan and practice with your family.
Plan for two scenarios when building your disaster supply kit: remaining in your home or evacuating to a safer location.
Store items in airtight plastic bags, and use 1-2 portable containers for your whole kit.
Inventory on-hand supplies, and purchase any additional items. Building and maintaining your kit over time can help offset the cost.
Basic Disaster Supply Checklist
- Cash: Banks and ATMs may not be open or available for extended periods
- Water: At least one gallon per person per day for 3-7 days for drinking and sanitation
- Food: Enough for 3-7 days, including non-perishable packaged or canned food and juices, food for infants and the elderly, snack food, manual can opener, vitamins, etc.
- Meal supplies: Paper plates, paper cups, paper towels, and plastic utensils
- Radio: Battery-powered radio and NOAA Weather Radio with extra batteries
- Sleep: Sleeping bag, blankets, and pillows
- Clothing: Seasonal clothes, rain/snow gear, and sturdy shoes
- First-aid kit with medicines and prescription drugs
- Toiletries: Hygiene items, moisture wipes, and sanitizer
- Flashlight and batteries
- Car and house keys
- Toys, books, and games
- Fire extinguisher
- Whistle to signal for help
- Dust mask to filter contaminated air
- Wrench or pliers to turn off gas or utilities
- Maps
- Cell phone with chargers and a backup battery
- Paper and pencils
- Household chlorine bleach and medicine dropper to disinfect water
- Glasses, contacts, and contact lens solution
- Infant formula, bottles, diapers, wipes, and diaper cream
- One week or longer supply of prescription medicines with a list of all medications, dosage, and any allergies
- Copies of medical insurance and Medicare identification cards
- In case of emergency (ICE) contact information for doctors, relatives, or friends to be notified if you are injured
See more about preparing emergency supply kits specifically for people with disabilities.
Pet Supplies Checklist
- Pet food: At least a two-week supply of dry food in a water-tight container or canned food (include a manual can opener)
- Water: At least a two-week supply of clean water; large dogs need one gallon per day
- Portable carrier large enough for the pet to stand up, turn around, and lie down
- Extra leash and collar or harness with an identification and rabies tag
- Up-to-date health and immunization records
- Two-month supply of medications like flea, tick and heartworm prevention
- Toys, treats, and bedding (familiar items can help reduce stress for your pet)
- Registration information, adoption papers, and vaccination documents: Discuss microchipping and enrolling your pet in a recovery database with your veterinarian.
- First-aid kit, including cotton bandage rolls, bandage tape and scissors, antibiotic ointment, flea and tick prevention, gloves, isopropyl alcohol, saline solution, and a pet first aid reference book
- Pet litter and litter box if appropriate, newspapers, paper towels, plastic trash bags, and household chlorine bleach
- Picture of you with your pet to document ownership if you become separated: Add a note specifying your pet’s species, breed, age, sex, color, and distinguishing characteristics
Keep your disaster kit fresh
Remember to replace your stored food and water every six months. Dedicate one area of your cabinet or pantry to non-perishable food like peanut butter and jelly that you continuously replace.
- Keep canned food in a cool, dry place.
- Store boxed food in tightly closed plastic or metal containers.
- Keep a supply of fresh batteries.
- Use items and continually replace them to avoid expiration and waste.
- Review your needs and update your kit annually.
Water supply is a top priority
Make your emergency water supply a top priority. Your requirements will vary depending on age, physical condition, activity, diet, and climate.
An active person needs at least two quarts of drinking water daily, so store at least one gallon of water per person per day for a minimum of three days. This amount will provide for drinking, cooking, and sanitary needs.
Children, nursing mothers, and people with health issues will need more. Keep in mind that high temperatures can double the required water amount.
Store your water in thoroughly washed plastic, fiberglass, or enamel-lined containers. Don’t use containers that can break (like glass bottles) and never use a container that has held toxic substances. Plastic containers like soda bottles work, and camping stores offer various containers.
Seal your water containers tightly and label and store them in a cool, dark place. Put a date on each container, and change stored water every six months.
Identify and gather important documents
Collect your household documents and create a photographic inventory of your household contents and valuables for an efficient insurance claims process.
- Insurance papers
- Medical records
- Bank account numbers
- Social Security cards
- Deeds or mortgages
- Birth and marriage certificates
- Stocks and bonds
- Recent tax returns
- Wills and estate papers
- Emergency or hotline contact information
- Valuables and priceless personal items
Secure your documents in a safe place. Store paper copies in a fireproof and waterproof box or safe at home, in a bank safe deposit box, or with a trusted friend or relative. Keep electronic copies of important documents in a password-protected encrypted format on a removable flash or external hard drive in your fireproof and waterproof box or safe, or use a secure cloud-based service.
Store your disaster supply kit, documentation, and valuables in waterproof containers away from basements or other home locations that may flood.
Store multiple kits in multiple locations
A disaster can occur when you are at home, work, or traveling. Prepare a kit for your home, work, and all vehicles.
- Home: Have this kit in one location that all family members know and can access.
- Work: Prepare to shelter at work for at least 24 hours with food, water, and other needed items like medicines and comfortable walking shoes stored in a portable container.
- Vehicle: Keep an emergency supply kit in your car.
More Resources
- Ready. Build A Kit.
- Ready. Individuals with Disabilities.
- FEMA. Safeguard Critical Documents and Valuables.
Quickly changing weather and environmental conditions demand careful attention. You can stay safe by staying aware of the latest disaster events in your community in a variety of ways, including those that operate without electric power.
No matter how you receive your updates and alerts, make sure you choose more than one method so you have a backup plan during any emergency.
What You Can Do Right Now
Purchase a NOAA Weather Radio receiver with backup battery power. NOAA Weather Radio from the National Oceanic and Atmospheric Administration is a nationwide, 24-hour radio station network that broadcasts continuous weather information like forecasts, watches, warnings and all-hazard updates, such as earthquakes or environmental events like chemical releases or oil spills.
NOAA Weather Radio is commercial-free but requires a specific receiver or scanner that is widely available for as little as $30. You may need an external antenna if you are more than 30 miles from the nearest transmitter.
The nationwide Emergency Alert System can deliver wireless emergency alerts to your devices. In addition to NOAA Weather Radio and the Emergency Alert System, you also may be covered by a community-level emergency alerting system.
If your government alerting system uses landline telephones, but you do not have one, you may still be able to connect your mobile devices to Enhanced Telephone Notification systems like Reverse 911© and text messages. Strobe lights, pagers, computers, and text printers can be connected for the visually and hearing-impaired, as well.
Download your state or local emergency management agency app and the FEMA app. Enable text message alerts (message and data rates will apply).
Look for updates from official local government and emergency management agencies and utility providers on their websites and social media to stay current before, during, and after a disaster.
Sign up for listservs and emergency alerts from your workplace, school, houses of worship, or other community organizations that provide notifications during an emergency.
What to Do During Extreme Weather
Monitor weather forecasts frequently using apps, devices, government alerting services, radio/television news, and social media. Always keep your cell phone charged and activate location settings that allow weather-related apps to follow and alert you no matter where you go.
No matter how you plan to receive emergency alerts, listen to broadcasts and check online every 30 minutes during emergencies to stay current on the latest updates and essential instructions.
More Resources
Why does it matter?
Your house design and shape are critical to handling lateral loads from high-wind events like hurricanes and tornadoes.
What do I need to know?
A square house has the same load in every direction because its size and sides are uniform. Conversely, a long, narrow house will experience a much larger load on the long sides than on the short sides. Walls parallel to the lateral load must be designed and built to anticipate and handle this loading.
Roof shape affects the way a home handles high winds as well. A hip roof will withstand high winds better than a gable end roof as the gable can act like a sail on a ship and provide a large surface area for the wind to be blown against.
Where do I start?
If you are building new or adding to your home, use a hip roof design instead of a gable to benefit from the aerodynamics of the hip shape option. If you already have a gable shape or must use one for design reasons, you can reinforce the gable by bracing it to provide the strength necessary to resist high wind forces.
More Resources
Why does it matter?
Your home is more likely to experience damage during a high-wind event if the area immediately around your home has objects that can be moved by the wind. If you have time, safely secure outdoor items or bring them inside (ex: furniture and other outdoor equipment on your patio or deck). Don’t forget trash cans, grills, toys, and potted plants. Keep them from becoming flying objects. Also remove any debris like fallen tree branches.
What do I need to know?
- Secure outdoor furniture, grills, fire pits, playground equipment, toys, yard decorations, potted plants, or items like trash cans that you cannot move into a storage shed or garage. Attach them to decks or patios with ground anchors with cables or chains. Never bring unsafe items like propane tanks inside.
- In general, if an object can be safely stored indoors, bring it in. If not, it needs to be anchored where it is located outside. Nothing should be left unsecured as even the heaviest of objects can be moved by the high winds of a hurricane or tornado.
Where do I start?
- Walk around your yard and find anything that looks like it can be moved by high wind.
- Start to plan which items will be brought indoors or which items will be secured in place.
More Resources
- Use the outdoor inventory checklist to identify items in your yard that need to be secured.
Why do they matter?
Downed, falling, and damaged trees account for most major wind-related house damage in hurricanes. More than 30 years ago, Hurricane Andrew toppled 38% of the trees in its path. Hurricane Charley knocked down 10,000 trees in Central Florida in 2004, and Hurricane Katrina’s 120 mph-plus wind speeds took down approximately 20% of urban trees in 2005. In October 2018, Hurricane Michael devastated 26 square miles of the tree canopy, an area equal to the size of Pensacola, Florida, plus four additional square miles. The Hurricane Michael tree losses introduced a multi-year wildfire threat as the downed trees decayed across the affected forests.
Tree damage is a dangerous problem in tornadoes as well. Beyond wind intensity; factors influencing tree damage include:
- Tree species, age, and condition
- Soil characteristics
- Rain amount and duration
What do I need to know?
While you cannot build a home strong enough to withstand the weight and impact of a large tree, you can plan and maintain your landscape to reduce the risk of trees falling on your home. Certain species are more vulnerable to wind damage, such as southern pine, pecan, red oak, and water oak. Species with shorter life spans are more susceptible to storm damage as well.
Consider three factors when evaluating your yard: species, tree health, and location. Place trees far enough from your home that they could fall without causing damage. Maintain the space between your home and any nearby tree to ensure it exceeds the fully grown tree height.
In addition to trees, you should evaluate your hardscape and other elements that might cause damage in high winds. Secure or remove barbeque grills, fences, flag poles, garden decorations, lawn furniture, outdoor lights, and swing sets. Anchor building components, such as gutters, downspouts, and exterior air conditioning or pool equipment.
Where do I start?
Evaluate Your Trees
Check your yard for weakened trees that could fall or lose limbs during high winds. Look for:
- Cracks in the trunk or major limbs
- Trees that lean or look one-sided
- Branches that hang over the house or near the roof
- Tree limbs that touch power lines
- Obvious decay or mushrooms growing from the bark
- Insect infestations
Call and text or email a picture to your local home improvement garden center, nursery, or government extension office if you have questions about your trees.
Care for Your Trees
- Regular and proper pruning can improve the health and vitality of your trees.
- Remove dead, diseased, or damaged parts of the tree to stop the spread of disease and harmful insects that weaken or destroy the tree.
- Never prune tree branches flush to the trunk as doing so removes part of the trunk. Leave a small branch section next to the tree trunk to avoid making the tree susceptible to decay or insect damage.
- Contact a professional to evaluate, limb, or remove large trees near your home. Ensure you hire a skilled, licensed, insured professional as tree removal is dangerous.
Plant strong trees
Some tree species are more prone to storm damage. A tree more likely to survive storms is compact, with a low center of gravity; a strong, sturdy trunk; and a deep, symmetrical root system. City foresters, government extension offices, home improvement garden centers, nurseries, and landscape firms can advise on smart tree selection for your area and soil conditions.
Use Safe Landscaping Materials
Rock and gravel landscaping swiftly become projectiles in high-wind events. Consider replacing these landscaping materials with fire-treated mulch to reduce the risk of damage when severe weather begins.
More Resources
- Read more at Gardening Know How: Landscaping For Storms: Yard Design For Natural Disasters.
- FLASH. Resilient Design Guide: High Wind Wood Frame Construction Edition.
- FLASH. Resilient Design Guide: Concrete Construction Edition.
- FEMA. Remove Trees and Potential Windborne Missiles.
Why does it matter?
High wind events like hurricanes and tornadoes as well as fast-moving floodwaters or tsunamis can move or dislodge fuel tanks causing a threat to you, your family, and others. Take action today to keep your fuel tank in place.
What do I need to know?
- An unanchored tank can damage your home or other structures when the supply line comes loose, causing fuel spills, contamination, and even fire.
- If your tank is buried underground, water saturation can push it to the surface.
- One of the most effective fuel tank anchoring methods is an attachment to a concrete slab with sufficient weight to withstand the force of floodwaters or high winds. Tanks located outside can also be anchored by running straps over it and using turnbuckles to attach them to the concrete slab.
- See FEMA. Anchor Fuel Tanks for more details on these methods.
Where do I start?
- Keep floodwaters out of the tank by extending all filling and ventilation tubes above the 100-year Base Flood Elevation (BFE) or expected flood level.
- Shut off all connections once flood watches and warnings are issued.
More Resources:
- FEMA. Anchor Fuel Tanks.
Why do they matter?
In a high-wind event such as a hurricane or tornado, keeping the roof on your home is a top priority as is protecting it from wind-borne debris and hail. A resilient roof system will provide wind-resistance and impact-resistance when it counts the most.
What do I need to know?
The roof is the primary structural element of the house, transferring the loads that act on the walls facing the wind into the walls that are parallel to the wind. The roof structure includes framing and roof sheathing, which is covered by a roof covering that serves as a barrier to weather and keeps water from entering the structure.
Roof framing can be composed of either rafters cut from dimensional lumber, often called “conventional framing,” or engineered trusses. Either can provide a strong and secure means of framing a roof. Proper design and installation of roof framing is critical, including the connections of any roof elements by a mechanical means such as metal connectors.
The main structural components of the roof assembly include:
- Strong nailing of the roof deck to the framing, especially at the edges
- Connection of the roof to shear walls with blocking
- An unbroken double top plate on the shear walls that acts as a structural chord.
The connections between the roof and walls are crucial, including:
- Rafter at Ridge Board. Typical construction practices include cutting out a ridge vent in the roof decking to allow for air to flow freely from inside the attic. This free flow of air causes an unintended weakening of the roof diaphragm at a critical location because the ridge board serves at a boundary of the roof diaphragm. When the decking is cut away for the vent, the decking is no longer connected between the rafters. Installing a strap or straps will strengthen the connection between rafters allowing for roof venting at the ridge.
- Rafter at Top of Wall. Rafters attached to the top of a wall in a high-wind zone should be fastened to the top plates of the wall with more than just framing nails. Typically, metal connectors, straps, or clips, are specified to hold down the rafter. Eave blocking between the rafters in high winds does more than keep the birds out of the attic; it helps tie the roof diaphragm to the walls and keeps the rafters from rolling due to lateral loads.
- For Concrete Design, the top plate is anchored to solid concrete or grouted masonry.
- Truss at Top of Wall. When a truss attaches at the top of the wall, it is similar to a rafter in the hold-down connection. A metal strap or clip is specified to hold down the truss in the same way a rafter is held down, but the eave blocking detail is somewhat different. Most local building codes do not require full eave blocking when trusses are used for the roof structure; however, 2×4 blocks should be installed to help resist lateral loading.
Ensure the same strong roof design and connections are made throughout the house, including other areas such as porches, lanais, carports, and breezeways.
Where do I start?
- If you’re not ready to reroof, contact a home inspector or licensed roofer to evaluate your roof and identify any retrofit options such as installing additional metal connectors to secure the roof to the wall.
- If you’re ready to reroof, ask your roofer to include resilience upgrades such as installing a high-wind resistant roof covering, renailing the roof sheathing, and installing a secondary water barrier to seal the roof deck.
More Resources:
- FLASH. Resilient Design Guide: High Wind Wood Frame Construction Edition
- FLASH. Resilient Design Guide: Concrete Construction Edition
Why do they matter?
When wind forces enter your home, the pressure can build up until it eventually causes the weakest part of your home to rupture. Think of it like blowing up a balloon. Once the internal pressure reaches a certain level, it pops. That is why it is essential to protect all your home’s openings (windows, entry doors, garage doors, skylights, sliding doors, gable end vents, etc.) to keep the wind and pressure out.
When you protect your openings, they can resist impacts from hail or windborne debris like flying missiles, tree limbs, or roofing material that break windows and breach doors and allow pressurization to occur. Protecting your openings and keeping them intact can prevent wind-driven rain and moisture from entering your home as well.
One of the most effective opening protection options is to install impact-resistant windows.
What do I need to know?
- Impact-resistant windows are made with special glass that will not fall out of the frame and let wind and water into the house.
- Impact glass is similar to the laminated windshield in your car. It may crack and break, but it will not come apart easily.
- Impact-resistant windows are always in place to protect the home, so you do not have to install or activate their protection.
- Typically, impact-resistant windows are more expensive than standard windows, but the extra cost may not be prohibitive compared to mid-to upper-range windows. Further, the cost of impact-resistant windows may equal the cost combination of new standard windows plus a shuttering system.
- Impact-resistant windows are tested and rated with large and small missile tests.
- Large missile: A six feet, nine lb. 2 x 4 missile fired at 50 feet per second.
- Small missile: Thirty pieces of roof gravel fired at 80 feet per second.
- Compliant impact-resistant windows, shutters, and doors carry proof of compliance identified on a sticker or label or imprinted into the product. Additionally, the product paperwork should document compliance with all relevant testing standards.
- Follow manufacturer specifications when installing impact-resistant windows. Improper installation may cause a voided warranty or, worse, a product failure that presents a threat to life and property. Learn more about installing windows here.
- If impact-resistant windows are not an option for you, you can install shutters that can absorb the shock of windborne debris without allowing the window glass to break. Learn more about hurricane shutters options here.
Where do I start?
Replacing your windows
- Check with your local building department for information about the window design pressure ratings and windborne debris protection requirements that windows should meet.
- Impact-glass cannot be installed in older, existing window frames. It must be installed as a complete window system, including the frame as that is how it is tested.
More Resources:
- FLASH. Resilient Design Guide: High Wind Wood Frame Construction Edition.
- FLASH. Resilient Design Guide: Concrete Construction Edition.
Why does it matter?
Roof framing is the primary structural element of a roof.
Beneath the asphalt shingles or clay tiles or metal slats of your roof is an intricate structure, not unlike a skeleton. The framing of your roof is a crucial component to your home’s weather resistance, particularly in high-wind events.
As a homeowner, you need to make sure the structure and materials of your roof framing are both sound and secure.
What do I need to know?
Typically, residential roof framing is with wood rafters or wood trusses. However, there are also all-concrete roof systems available including precast planks, insulating concrete deck forming systems, and conventional concrete forming for increased resiliency of roof structures.
Your roof’s performance during high-wind events requires that the roof-framing members be properly designed and spaced, that there is proper lateral bracing supporting roof framing, and that there are adequate connections between the roof structure and the wall.
The FLASH Resilient Design Guide: High Wind Wood Frame Construction Edition provides the following guidance on resilient roof framing:
- Resilient framing spacing = 16” O.C.
- Resilient eave blocking = 2x eave blocking
- Resilient framing connection = metal strap at every truss, metal strap tie at ridge
Where do I start?
- In new construction, ensure there is a roof-to-wall connector at every truss or rafter where it sets upon the top of the wall.
- In an existing home, if roof-to-wall connections are not present, you may consider installing these during re-roofing when this area is more accessible by removing the lowest roof of roof sheathing.
- You may be able to retrofit and strengthen your existing roof framing without reroofing if you can access your attic by installing roof-to-wall connectors.
More Resources:
- FLASH. Resilient Design Guide: High Wind Wood Frame Construction Edition.
- Local Officials Guide For Coastal Construction.
Why does it matter?
Gabled roofs have two sloping sides that come together at a ridge, creating end walls with a triangular extension, called a gable. Gable end walls look like a standing letter “A” at the top as opposed to the more aerodynamic hip-shape roofs that look like a leaning letter “A.”
In nearly every hurricane from Hurricane Andrew in 1992 to Hurricane Michael in 2018, homes with unreinforced gable ends sustained high- wind damage. Often, the damage occurred because the large, flat areas of a gable end wall receive the wind’s full effect as it blows against the home.
Think of the gable end like a sail that meets the wind. When the wind overwhelms the sail, the boat moves. It is critical to reinforce your home’s gable end walls so nothing moves or is displaced when the wind hits it full force.
Gable end walls should be adequately braced and anchored as it is the place where the roof framing, decking, underlayment, and coverings meet. Fortunately, of all the possible structural retrofits for a house, gable-end walls are often the easiest to strengthen.
What do I need to know?
Three potential failures related to gable-end walls include:
- Loss of roof sheathing from the gable end that results in the gable wall losing its bracing along the top edge.
- Failure of the connection of the gable wall to the wall below.
- Failure of the framing members that make up the gable-end wall structure. In many houses, these members are the structural members of the end roof truss.
- The rake is an overhang at the gable-end wall that is particularly vulnerable to wind forces, so it should be adequately and properly attached to the rafters and top of the wall.
- Gable-end walls should be braced back into roof framing and must have a minimum 7/16” structural sheathing.
- Homes with gable ends built before modern building codes that required gable-end bracing should be retrofitted to meet today’s performance standards.
- The taller the gable-end triangle, the higher the risk of damage in a high-wind event. For gable ends that are more than 4-feet tall, nailed connections are unlikely to withstand high-wind forces. These gable ends should be retrofitted with the methods described in this article.
Retrofitting gable ends to brace the walls features two activities.
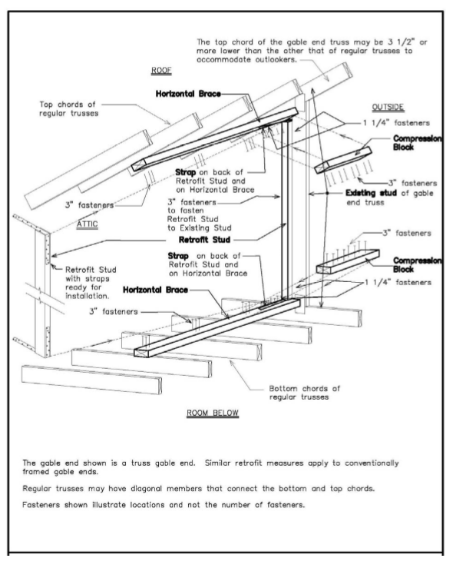
The first activity is strengthening and bracing the gable end. This retrofit makes the triangular shape end wall stronger by anchoring the wall to the roof and ceiling structure.
- The first step in strengthening and bracing the gable-end wall is installing 2×4 braces that butt up against the gable end that extend at least 6’ into the attic’s interior. These 2x4s, called Horizontal Braces, distribute (share) the wind loads applied to the gable-end wall with a larger area of the roof structure, permitting the house to absorb better the forces applied to the gable end. The horizontal braces are used to transfer the wind forces applied to the gable end into the roof and ceiling and distribute them over a large enough area to avoid local failures of the roof sheathing, ceiling drywall, or plaster.
- The second step to strengthen and brace the gable end is to attach new studs (retrofit studs) next to the studs already in the gable-end wall because existing gable-end studs are usually not strong enough.
- The third and final step in strengthening and bracing the gable end is to connect the retrofit studs to the horizontal braces by using straps and compression blocks. Completing these steps strengthens the wall and ties it into the roof structure so that it is a much stronger unit.
The second activity is strengthening the wall-to-wall connection: This activity focuses on connecting the gable end wall to the exterior wall below by connecting the wall below to the reinforced gable-end wall with straps, brackets, or screws between them to make a strong connection. A good connection between a strengthened gable-end wall above and the wall below will help strengthen the lower wall by keeping the top of it from moving, thereby making the home’s whole end wall much stronger and better able to resist wind loads. You will need to determine which kind of connection (straps, brackets, screws, etc.) is appropriate when you evaluate the gable end.
Conclusion: The types of walls and way the walls are connected will determine whether strengthening and bracing the gable end or strengthening the wall-to-wall connection should be done first. If the gable-end wall is a conventionally framed wall and the wall studs are merely toe-nailed in place, then you should install straps or right-angle brackets to anchor each of the studs longer than 3’ to the upper and lower framing members. If you attach the studs to the top and bottom plates using brackets that must be nailed to the top and bottom plates’ edge, they must be installed before the horizontal braces are installed.
Where do I start?
Contact a licensed, bonded, and insured contractor to perform end bracing and strengthening retrofits.
More Resources:
- FLASH. Resilient Design Guide: Concrete Construction Edition.
- FLASH. Volunteer Guide Mitigation For High Wind Events.
- FEMA. Brace Gable End Roof Framing.
- FEMA P-804. Wind Retrofit Guide for Residential Buildings.
- Hurricane Retrofit Guide. Gable End Overhangs.
- South Carolina Safe Home. Gable End Bracing.
Why do they matter?
Your home’s ability to resist extreme wind forces is only as effective as its weakest link, and the most effective way to create a hurricane-resistant home is to secure all connections starting with the roof-to-wall connection.
The roof is your home’s first line of defense from a storm. To make sure the roof stays in place when severe winds blow, securely anchor roof-to-wall connections by installing metal connectors (hurricane straps or clips) or screws at every wall-to-rafter connection. Keep in mind “hurricane straps” is jargon for the connection that is made between the roof and wall structural members, but this same connection also enhances the structure against other high winds, such as those from tornadoes.
What do I need to know?
Wall connectors and straps
- For existing construction, the easiest time to add hurricane clips is during re-roofing. If re-roofing your existing home is years away, it is possible for professional contractors to reinforce an existing home’s roof-to-wall connections with hurricane straps and clips. This is often accomplished by removing soffits to access the connections. These connections are critical in holding your roof together and will dramatically increase your home’s overall resistance to wind.
- Along with roof-to-wall connections, all joints in your home (floor-to-floor and wall-to-foundation) must also be secured to create a “continuous load path” to transfer wind loads to the building’s foundation.
- Secure floor-to-floor connections by making sure each floor in your home is connected to the floor below with straps or clips in addition to any other code-required nailing schedule for wall sheathing or wood frame walls.
- Wall-to-foundation connections should be made through the use of anchor bolts or mud-sill anchors.
- Install all connectors following the manufacturer’s installation specifications.
Why Does it Matter?
Decades of post-storm damage investigations after hurricanes, tornadoes, and severe thunderstorms reveal that more than 90% of house damage in severe wind events begins when garage doors separate from their mounting, collapse, or cave in due to windborne debris impacts. The doors are vulnerable because they are your home’s largest and weakest openings.
However, the National Institute of Standards and Technology (NIST) analysis indicates that strong, reinforced garage doors can serve a vital and protective role in severe winds. NIST found that homes with intact garage doors following a severe wind event are likelier to retain their roofs and the walls adjacent to the garage. The correlation between intact garage doors and undamaged roofs remained effective in windspeeds up to 135 mph.
What do I Need to Know?
What makes one garage door stronger than another?
- Metal thickness (gauge) of the door to resist pressure and impact of windborne debris.
- Number and strength of mounting brackets and connectors holding the door and track to the wall and the ceiling.
- Horizontal strengthening to reinforce the door against buckling.
What type of doors are best for high-wind locations?
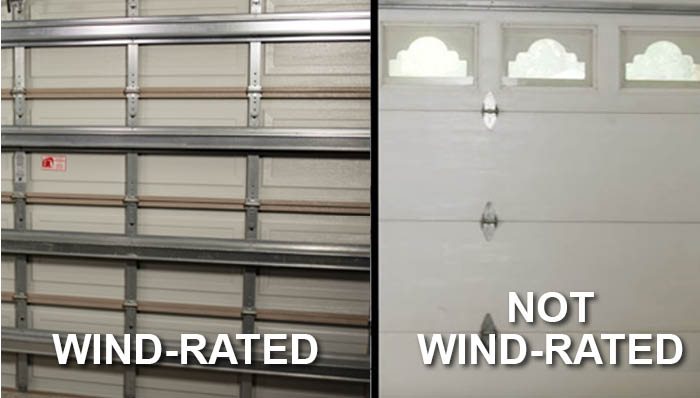
- Wind-rated and impact-resistant doors that are tested and approved for use in your location. Wind-rated is good. Impact-resistant is better.
- Single-car garage doors usually resist wind forces better than two-car garage doors.
- Doors without glass or glazing are better than those with glass or windows unless the glass is impact-resistant.
How do you know if your garage door is impact-rated or wind-rated?
Determining whether garage doors are wind-rated or impact-resistant can be challenging without proof of compliance labeling (typically a yellow or white sticker listing pounds per square foot or PSF.)
If your door does not have a sticker, contact the manufacturer or a local distributor.
Where do I Start?
How can you strengthen your existing garage door?
Strengthen your existing garage door
- Check the mounting brackets and connectors and make sure the screws are tight and the track is not loose.
- Add mounting brackets and connectors if you only have three or four on each side.
- Replace rusted pins or worn-out rollers, and make sure they are balanced.
Brace Your Garage Door
You have three basic options for preparing your garage door to withstand high winds.
- Replace and upgrade your garage door with a wind-rated or impact-resistant version. The costs will vary depending on the type of doors you choose and the installation cost where you live. However, you can expect to spend approximately $2,000 to $9,000.
- If you aren’t ready to replace, consider having a professional install a ready-to-install garage door storm kit with purpose-built garage door struts and braces. You can expect to spend approximately $200 to $750 for this solution, and you can save money if you are handy and have the necessary tools for the job.
- Build temporary, Do-It-Yourself 2-by-4 wood braces to reinforce your non-wind-rated door before a storm arrives. This is the lowest-cost solution and will cost approximately $150 for materials plus more for installation unless you are handy and have the necessary tools for the job.
Why do they matter?
Design pressure (DP) ratings indicate the maximum amount of positive (pushing) and negative (pulling) pressure that your windows can withstand without breaking during events like hurricanes or tornadoes. Understanding the DP of your windows matters because it can help you evaluate the potential performance of your home in a high wind event. Knowing that your windows have a lower DP may also help make a case for investment in hurricane shutters or newer, impact-resistant windows.
Design Pressure (DP) rating on windows is different from impact-resistance ratings. DP only reflects wind pressure, not impacts from flying missiles or windborne debris that commonly occurs in high-wind events.
What do I need to know?
- Use products that are tested and approved using a standard established through a recognized product approval system or evaluation report.
- Refer to your local building department to identify appropriate DP Ratings. DP ratings and requirements vary by your wind zone location and even by the window location in the wall. For example, DP rating requirements in the middle of the wall may be lower as the pressure is lower there compared to windows located near the edges where wind pressure is greater.
- Avoid designs that include large spans of glass, windows with multiple panels, and double entry doors when constructing a new building in areas subject to high winds. Single door widths and windows should not exceed three feet.
- Correct window installation is essential for proper window performance. Choose the correct DP rating, add impact-resistance attributes, and follow manufacturer-provided instructions to ensure windows perform optimally in high winds.
Where do I start?
Replacing your windows
- Check with your local building department for information about the required DP for windows where you live.
- Follow manufacturer specifications when using or installing wind-resistant windows. Improper installation may cause a voided warranty or even product failure that presents a threat to life and property.
- Enhance your window performance by selecting windows rated for both wind pressure and impact resistance from flying debris.
More Resources:
- FLASH. Resilient Design Guide Wood Frame.
- FLASH. Resilient Design Guide Concrete.
Why do they matter?
Your exterior walls, doors, and garage doors serve as part of the protective shell of your home. If the shell breaks during a hail, hurricane, tornado, or another high-wind event, wind can enter your home and allow pressure to build on the roof and walls, often leading to damage.
Doors are one of the weakest parts of the wall, so they must be designed and installed correctly to keep wind and wind-driven rain out of a home. It is important to determine your door’s potential performance by knowing how much wind load it is designed to carry and evaluating whether it is wind or impact-rated.
Reviewing the relative strengths and weaknesses of your doors is one of the essential steps you can take to increase your home’s strength in a hurricane or other natural disaster.
What do I need to know?
Here are some questions to ask when evaluating your exterior doors and their ability to resist wind and water damage.
- What is the overall strength of the door? What is the wind rating, or highest level of positive (pushing) or negative (pulling) pressure, that it is designed to handle before breaking? Door glass panels have their own type of design pressure (DP) and impact ratings, although the ratings are very similar to window ratings.
- Is the door impact-resistant and tested to withstand debris like flying limbs or other windborne missiles so common in hurricanes?
- Which direction does the door swing? Outswinging doors enjoy more wind resistance as they have the frame’s extra muscle to help resist wind pressure.
- How is the door anchored to the door frame, and how closely spaced are the anchors?
- How is the door connected to the wall frame, and how deeply do the connections extend into the wall?
- What is the throw length and width of the deadbolt? Does it extend well into the door or wall frame?
- Does the door have glass inserts or panels? If so, are they wind- or impact-rated? If not, you will need to protect it to keep wind and water from entering your home. Is your door a single or double-entry type? While attractive, double-entry present some unique considerations in high winds:
- Double-entry doors typically consist of an “active” door used when only one door is needed and an “inactive” door that usually remains closed but can open when necessary.
- Double entry doors are not as strong as a single door because the frame around them is more spread out, providing less wind resistance and making them more susceptible to wind pressure and damage.
- There are steps you can take to strengthen double-entry doors.
- Reinforce double-entry doors by adding a heavy-duty deadbolt or replacing the existing deadbolt with a longer, stronger one.
- Add slide bolts at the top and bottom of the inactive door. Replace the existing hinge attachment screws in the doors and door frame with longer screws that extend further into the doors and frame.
Here are some typical areas where doors can fail:
- Latch and Lock – this is a common weak point on doors as high winds can concentrate powerful forces at that single point. Many new door models feature three- and five-point latching vs. a traditional single-point latch and handle as they create a stronger door-to-doorframe connection.
- Hinges – the hinge side of the door is another potential weak point, so hinges require specific attachments to the doorframe and door to create a strong connection.
- Jamb and Frame-to-Wall – the door jamb and frame must be attached correctly to the structure to avoid door system failure, so follow the door manufacturers’ detailed specifications when you attach the system to the home.
- Threshold – the threshold is the bottom of the door frame and provides the transition from outside to inside and can be particularly vulnerable to wind-driven water. Sealing the bottom of the threshold to the door frame is essential and is often overlooked during installation.
- Flashing – Doors should be properly flashed and sealed for both wind and wind-driven rainwater. All four sides of the door should seal tightly to the frame and seal tightly to the structure.
Here are some things to keep in mind as you evaluate your doors:
- You can protect entry doors with an impact-resistant covering or by choosing using an impact-resistant door.
- You can protect doors further by covering the door opening with temporary plywood covers bolted to the door frame. This can be especially helpful if the doors contain glass panels.
- One or more entry doors should be operable from inside the living space even while opening protection is in place to ensure safe entry and exit.
- If your doors are old or damaged, consider replacing them with stronger doors by checking with home improvement stores or lumber yards.
- Heavy-duty deadbolt locks can provide extra strength for your doors as they have thicker and longer bolts, heavier strike plates, and heavier mounting hardware. Locksmiths, home improvement stores, and hardware stores can help you select and install stronger locks and slide bolts or other devices designed to strengthen and secure your doors.
- Impact-resistant doors will often have a tag or label on the edge of the door. Do not remove or paint over this label.
Where do I start?
Replacing or retrofitting your doors
- Check with your local building department for information about the wind speed rating and any possible impact rating requirement your doors should meet.
- If you would prefer not to reinforce or replace your existing doors by yourself, you can hire a professional. Home improvement, supply stores, and lumberyards often offer installation services.
More Resources:
- FLASH. Resilient Design Guide: High Wind Wood Frame Construction Edition
- FLASH. Resilient Design Guide: Concrete Construction Edition
Why do they matter?
The roof covering is one of your house’s first and most important defenses against hurricane winds and wind-driven rain, and unfortunately, it’s also often the weakest part of the roof.
What do I need to know?
- Common residential coverings include asphalt shingles, concrete and clay tiles, and metal panels.
- High-wind rated shingles, metal roof or metal panel/standing seam metal roof system, or concrete and clay tile are resilient roof coverings when installed along with the proper connections per manufacturer’s instructions for increased wind loads.
- Many hurricane-prone areas are also prone to hail. Look for wind and impact-rated roof coverings to protect roof coverings from wind and hail damage.
Types of roof coverings
Asphalt shingles
Two of the most common causes for damage to asphalt shingle roof coverings in high-wind events are improper installation and use of shingles that are not rated for the wind speeds identified in the building code. It is essential to understand the wind-resistance ratings and special installation methods for asphalt shingles in high-wind, coastal regions.
Pros:
- Relatively low cost, lightweight, and easy to install
- Good fire resistance (usually Class A)
- UL 2218 Class 3 and 4 impact resistance is available and should be used in hail regions
- Available with wind warranties up to 130 mph if installed per manufacturer’s high-wind requirements
- Asphalt shingles should be installed following FEMA 499 Technical Fact Sheet No. 7.3, which explains asphalt shingle installation, wind-resistance ratings, and weathering and durability
Cons:
- Aging and weathering may decrease effectiveness in high winds and impact resistance
Considerations:
- If you have an old roof replaced, your contractor should remove the existing shingles and underlayment rather than install new shingles. This approach allows the contractor to inspect the sheathing and make any needed repairs.
- For the highest level of wind-rated shingle, look for shingles that are rated to ASTM D3161 Class F or ASTM D7158 Class H. For the highest level of impact protection, look for shingles that meet UL 2218 Class 4.
- Nails for homes within 3,000 feet of saltwater should be hot-dip galvanized or stainless steel.
- Use six nails per shingle for three-tab shingles and follow manufacturer’s instructions when using architectural shingles.
- Ensure the shingles do not extend more than ¼” beyond the roof’s edge for a square drip edge.
- Your roofing designer should obtain manufacturer information on bond strength and nail pull-through resistance, and use products with the upper ranges of available strengths.
Metal
Pros:
- Attractive and relatively lightweight
- Last up to 40 years
- May have a Class A or B fire rating
Cons:
- Typically more expensive than asphalt shingles
- Cosmetic damage from hail may cause permanent dimples
Considerations:
- If installing a metal roof system, FEMA 499 Technical Fact Sheet No. 7.6 provides guidance on selecting and installing panel or shingle system.
- For metal roofs, use clips or cleats instead of exposed fasteners because they aren’t exposed to weather and they allow the metal to expand and contract reducing the opportunity for buckling
- If exposed fasteners are used on metal roofs, they should be corrosion resistant and penetrate the sheathing
Slate
Pros:
- Can last three times longer than shingles
Cons:
- Expensive and very heavy
- Some roof structures are unable to support slate
- Additional installation cost
Tile
Pros:
- Popular in some areas
- Available in concrete or clay
- Concrete tiles are more durable and can last more than 30 years
Cons:
- Performance in hail storms varies by type
- Clay tiles are brittle and can be easily chipped or broken
- Tiles are heavy, and some structures are unable to support the weight
- Can take longer to install making labor costs more expensive
Considerations:
- On tile roofs, use wind clips or storm anchors in high wind or seismic areas
- On tile roofs, two screws per tile give the highest wind uplift resistance and will help the tile resist shifting.
- Installation is critical in high wind areas when using clay or concrete tile, especially on the hip and ridge tiles
Wood shingles and shakes
Pros:
- Made from cedar, southern pine, or other woods
- Attractive appearance
- Perform moderately well against hail
Cons:
- May not be fire-rated unless treated with a fire retardant
- Some local codes limit their use
All other roof coverings
- All roof coverings, regardless of type, should be installed in accordance with the manufacturer’s installation instructions for the appropriate design wind speed.
Where do I start?
- Contact a licensed roofer in your area to evaluate your existing roof and determine what can be done to make it more resilient.
- Check local code requirements for roof repair or replacement criteria. Your local building official should be able to provide additional recommendations.
More Resources:
- FLASH. Resilient Design Guide: High Wind Wood Frame Construction Edition.
- FLASH. Volunteer Guide Mitigation for High Wind Events.
- FEMA. Secure Metal Siding and Metal Roofs.
- FEMA. Secure Composition Shingle Roofs.
- FEMA P-804, Wind Retrofit Guide for Residential Buildings.
- National Roofing Contractors Association (NRCA) Steep-Slope Roofing Manual
Why do they matter?
If you do not have wind or impact-resistant skylights, you may want to consider replacing them with newer models that are tested and approved to resist wind pressure, windborne debris impacts, and hail.
What do I need to know?
The best time to replace skylights is during re-roofing. Removing the old roofing material will provide easy access to replace the skylights with wind- and impact-rated types that do not need any additional coverage in high-wind events like hailstorms, hurricanes, or tornadoes. This is important as it is not only inconvenient to cover skylights before a hurricane, but it is nearly impossible to protect them before a hailstorm or tornado strike.
Where do I start?
Replacing your skylights
- Check with your local building department for information about the wind speed rating and windborne debris protection requirements your skylights should meet.
- Be sure to follow the manufacturer’s specifications when using or installing skylights as improper installation may cause a voided warranty or, worse, a product failure that presents a threat to life and property. Learn more about installing windows and skylights here.
- Select skylights that meet the Design Pressure (DP) ratings for your location.
More Resources:
- FEMA P-762, Local Officials Guide for Coastal Construction. Chapter 10: Windows, Doors, and Opening Protection.